Wednesday, December 23, 2015

Solution: Error starting daemon: Error initializing network controller: could not delete the default bridge network: network bridge has active endpoints

Followed this link and tried to remove /var/lib/docker/network and it worked :)
Used command sudo rm -r /var/lib/docker/network

Ref: https://github.com/docker/docker/issues/17083

Monday, December 21, 2015

Using require: 'ngModel' in your angular directives

The require instruction gives you the controller for the directive you name as the fourth argument to your link function. (You can use ^ to look for the controller on a parent element; ? makes it optional.) So require: 'ngModel' gives you the controller for the ngModel directive, which is an ngModelController.
Directive controllers can be written to provide APIs that other directives can use; with ngModelController, you get access to special functionality that's built into ngModel, including getting and setting the value. Consider the following example:
<input color-picker ng-model="project.color">
app.directive('colorPicker', function() {
  return {
    require: 'ngModel',
    link: function(scope, element, attrs, ngModel) {
      element.colorPicker({
        // initialize the color to the color on the scope
        pickerDefault: scope.color,
        // update the ngModel whenever we pick a new color
        onColorChange: function(id, newValue) {
          scope.$apply(function() {
            ngModel.$setViewValue(newValue);
          });
        }
      });

      // update the color picker whenever the value on the scope changes
      ngModel.$render = function() {
        element.val(ngModel.$modelValue);
        element.change();                
      };
    }
  }
});
This directive uses the ngModel controller to get and set the value of the color from the colorpicker. See this JSFiddle example: http://jsfiddle.net/BinaryMuse/AnMhx/
If you're using require: 'ngModel', you probably shouldn't also be using ngModel: '=' in your isolate scope; the ngModelController gives you all the access you need to change the value.
The bottom example on the AngularJS homepage also uses this functionality (except using a custom controller, not ngModel).

As for the casing of a directive, for example, ngModel vs ng-model vs data-ng-model: while Angular supports using multiple forms on the DOM, when you refer to a directive by name (for example, when creating a directive, or using require), you always use the lowerCamelCase form of the name.

Understanding angular ngModelController

Ref: http://radify.io/blog/understanding-ngmodelcontroller-by-example-part-1/

AngularJS’s ngModel.NgModelController is extremely powerful, but it can seem a bit daunting, what with its $formatters and $render function and $parsers... How do we get our heads around it?
This article assumes you’ve got a little bit of experience with AngularJS. You don’t have to be a brain scientist or a rocket surgeon or anything, so long as you’ve used it a little!
I developed this article from the notes I wrote as I was learning NgModelController - I found the learning curve a little steep so hopefully this can help somebody else hit the ground running!

What is ng-model?

ng-model is what Angular uses to two-way data bind values to controls, e.g.
<label>Username
<input ng-model="use.name">
</label>
What if you want to display a custom control for a complex value, though? What if you wanted multiple fields to represent a single value? That’s where NgModelController comes in!

What is NgModelController?

NgModelController is the same thing that Angular uses to bind ng-model to input boxes and menus and so forth and it has a lot of functionality that you can hook into and take advantage of.

What is NgModelController for?

NgModelController has the following advantages:
  • Allows you to set up validation on the ng-model
  • Ability to transform the underlying model to and from a view value that can be used to have a sophisticated interface
  • Supports transformation of the underlying value into a format that can be displayed differently, and transformation back to the underlying model
  • Allows you to monitor when the value has changed and whether it’s clean or dirty
  • Neat encapsulation - make the directive self contained
You would use NgModelController when:
  • You’ve got something you want to bind to ng-model and you need a sophisticated interface to it.
  • You want to render a value differently in the UI to how it is represented in the underlying model. For example, a calendar control.
  • You have specific validation you want to apply. For example, validating that a dateis within a certain range.

The values and life cycle

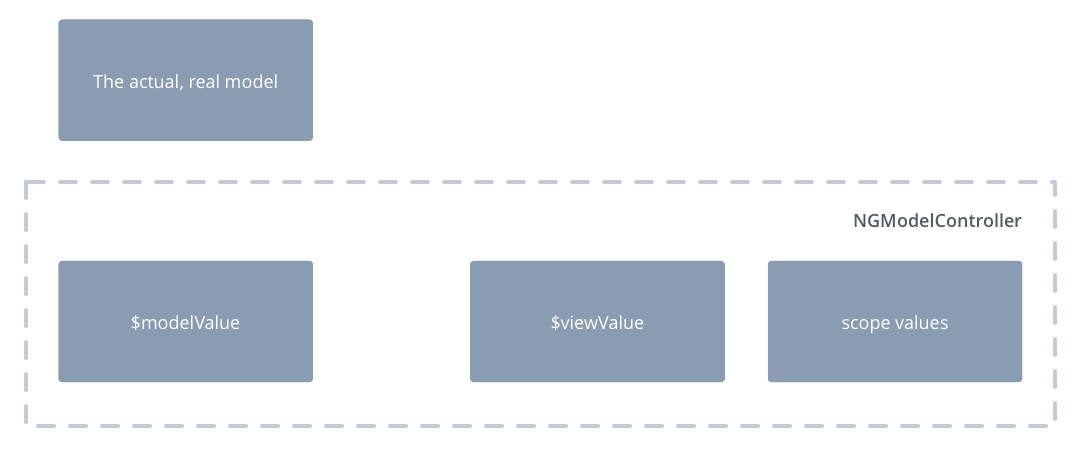
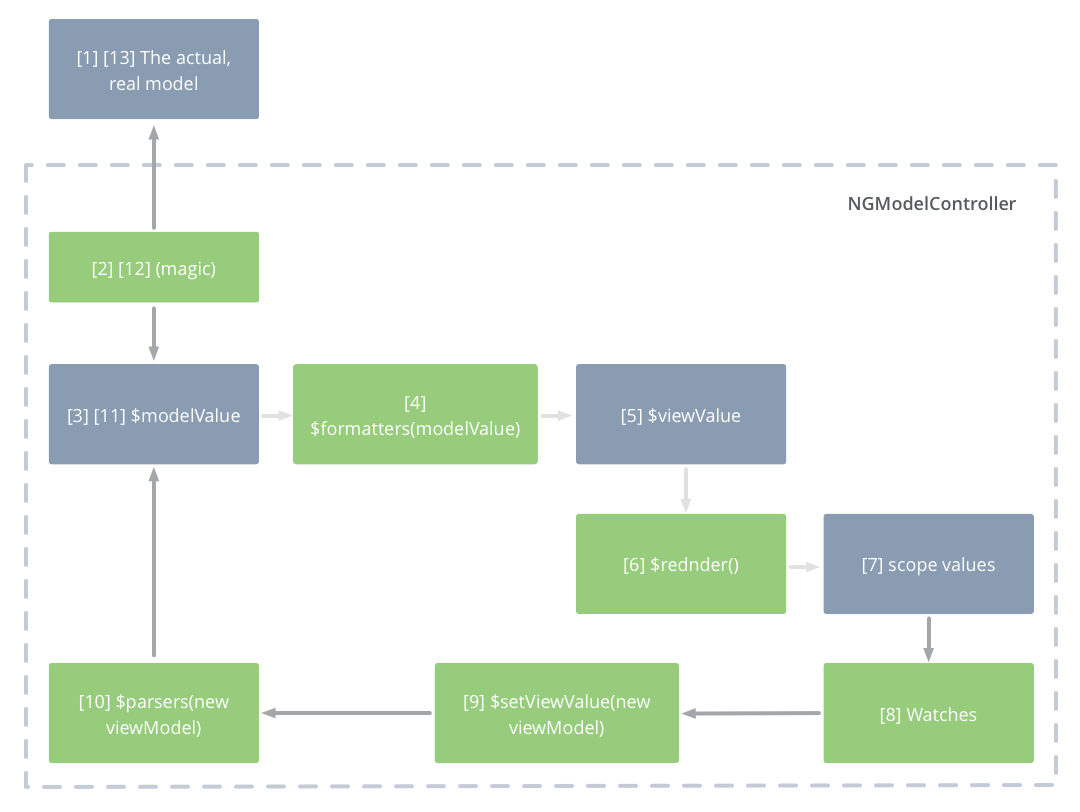
To allow the conversion of a piece of data into a format it can be manipulated in, and back again, NgModelController works by adding a $modelValue and a $viewValue as well as scope values local to the directive. This means that you have:
  1. The actual, real value.
  2. NgModelController.$modelValue - the internal value that gets synchronised with the ACTUAL value that’s linked by ng-model.
  3. NgModelController.$viewValue - the value that $modelValue gets translated to.
  4. scope values - used to bind things in your directive to. Usually a copy of NgModelController.$viewValue.
Here are where the values exist:
NG Model Controller values
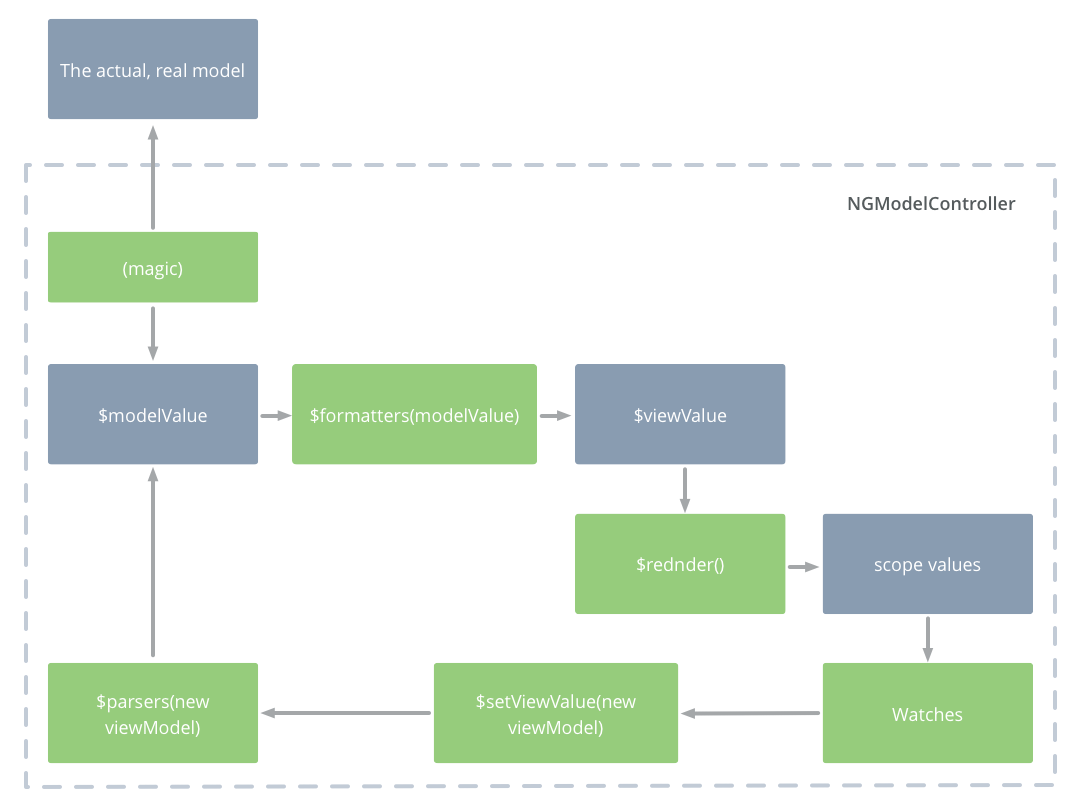
NGModelController handles synchronising them through the following process:
NG Model Controller values
Yikes! This looks a bit complicated but we are going to go through a worked example bit-by-bit to show how it all works. At some point it will “click” and you will harness the power for yourself!

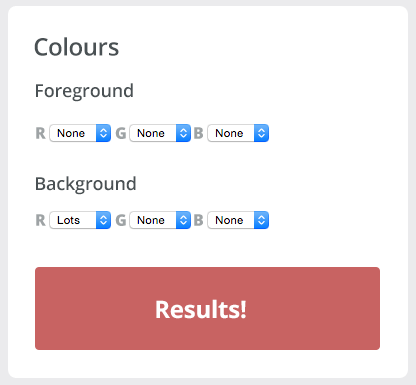
Example - a colour picker

I’ve made an example colour picker - it’s not amazing but it should illustrate the principles! It allows you to select None, Some or Lots of Red, Green and Blue channels respectively. Under the hood, that’s a single value (e.g. “#FA0”), but in the interface it is three select boxes:
Colour picker screenshot
You can play with the code yourself here: http://jsfiddle.net/cox0sba1/
We have two instances of our colour-picker custom directive and we use ngModelController to convert between the three channel values that the user sees (R, G, B) and the single underlying string that represents the value that ng-model is bound to.

The app namespace

We define an Angular module called “RadifyExample”:
angular.module('RadifyExample', [])

The controller

All the controller does is set up background and foreground colour values:
.controller('ColourPickerController', function($scope) {
    $scope.background = 'F00';
    $scope.foreground = '000';
})

The HTML bit

<div ng-app="RadifyExample" ng-controller="ColourPickerController">
    <h1>Colours</h1>
    <label>
        Foreground
        <colour-picker ng-model="foreground"></colour-picker>
    </label>
    <label>
        Background
        <colour-picker ng-model="background"></colour-picker>
    </label>

    <div style="background: #{{ background }}; color: #{{foreground}};" class="results">
        Results
    </div>
</div>
The two values - foreground and background - from the controller are bound by ng-model to a custom directive colour-picker. This gives us two colour pickers.
We then have a little area “Results” that simply renders the background and foreground in a div with the word “Results” so we can see what colours the user has selected.

The directive

First up is a simple template that shows three <select> controls.
.directive('colourPicker', function() {
  var tpl = "<div> \
     R <select ng-model='red'> \
         <option value='F'>Lots</option> \
         <option value='A'>Some</option> \
         <option value='0'>None</option> \
     </select> \
     G <select ng-model='green'> \
         <option value='F'>Lots</option> \
         <option value='A'>Some</option> \
         <option value='0'>None</option> \
     </select> \
     B <select ng-model='blue'> \
         <option value='F'>Lots</option> \
         <option value='A'>Some</option> \
         <option value='0'>None</option> \
     </select> \
 </div>";
We then have some initialisation - we restrict to ‘E’ for element, assign the template and create an isolate scope. The next bit is where we require 'ngModel', which gives us all the NgModelController functionality.
  return {
      restrict: 'E',
      template: tpl,
      scope: {},
      require: 'ngModel',
Now we have the real meat of the code - the link function with its injectedNgModelController instance ngModelCtrl:
      link: function(scope, iElement, iAttrs, ngModelCtrl) {
Inside the link function, we do a bunch of things. Firstly, we set up formatters (which convert the model value to view values):

Set up formatters

          ngModelCtrl.$formatters.push(function(modelValue) {
              var colours = modelValue.split('');
              return {
                  red: colours[0],
                  green: colours[1],
                  blue: colours[2]
              };
          });
Formatters can be a whole chain of functions. We are using just one. All we do is take the$modelValue - which is the underlying “actual” value within NGModelController and is a 3 character string - and split it so we have an array of 3 elements [red, green, blue]. We return these as an object, and they get set on the view value.

Set up render function

          ngModelCtrl.$render = function() {
              scope.red   = ngModelCtrl.$viewValue.red;
              scope.green = ngModelCtrl.$viewValue.green;
              scope.blue  = ngModelCtrl.$viewValue.blue;
          };
The $render function takes the values that are on the $viewValue of ngModelCtrl and puts them onto the local scope. In other words, it takes the $viewValue and renders it to the screen. This means that in the directive’s UI we have access to red, green and blue.
All we are doing here is taking the view value and putting it on the scope variables for access in the HTML template.

Set up a watch

          scope.$watch('red + green + blue', function() {
              ngModelCtrl.$setViewValue({
                  red: scope.red,
                  green: scope.green,
                  blue: scope.blue
              });
          });
We are telling the scope to pay attention to the three variables that we have put onto it - red, green and blue. When one of them changes, Angular, in its next digest cycle, will set the view value on the ng model controller, keeping the interface up to date and everything in sync.

Set up parsers (convert view value to model value)


          ngModelCtrl.$parsers.push(function(viewValue) {
              return '#' + [viewValue.red, viewValue.green, viewValue.blue].join('');
          });
Just like formatters, you can have multiple parsers, and again we’re just using one. All it does is join together the $viewValue’s [red, green, blue] array back into a 3 character string.

Step by step - what is happening in the colour picker?

Let’s take a look at what is actually going on when we use our colour-picker directive.

When you change one of the <select> field inputs…

So, when you change any of the <select> field values, that changes the scope value. Standard angular! This then kicks off a few things:
On changing the select
  1. The scope value has been changed
  2. The watch function picks up that something has changed on the scope value
  3. Watch calls $setViewValue, which sets the $viewValue
  4. Change to $viewValue sets kicks off the parser chain $parsers
  5. Parser chain updates the underlying $modelValue
  6. Some kind of Angular magic happens!
  7. The real model is updated. Everything in synchronised!

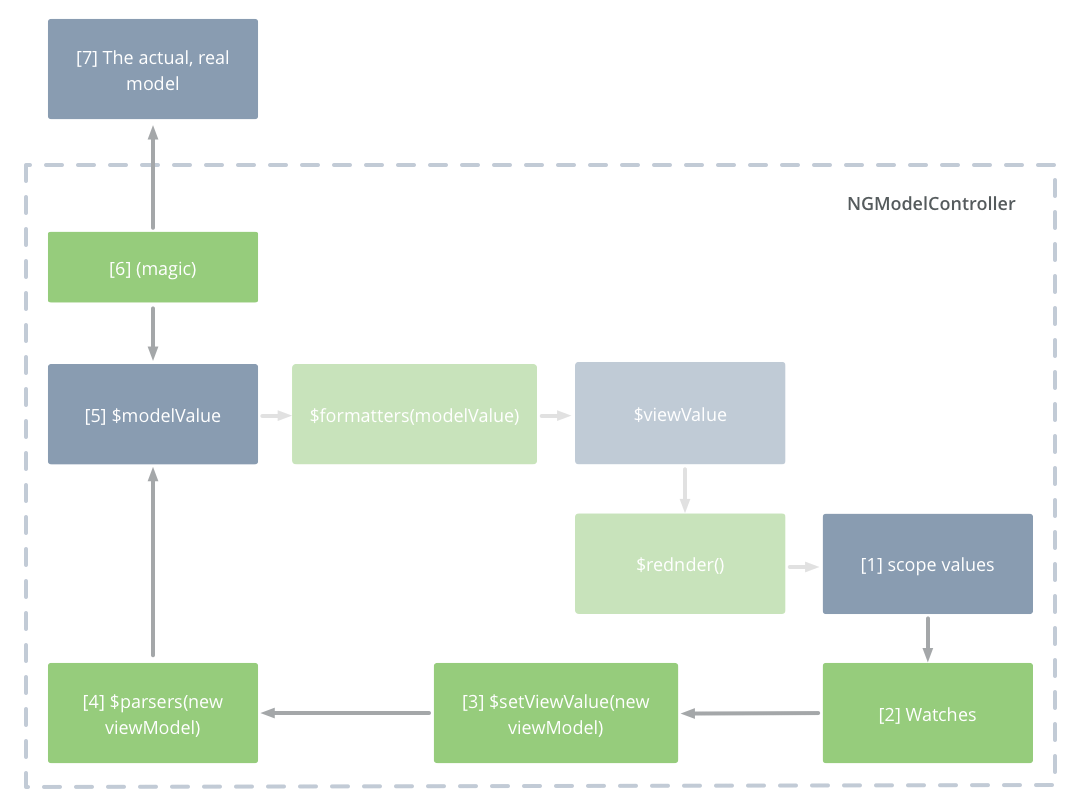
If something changes the underlying value...

So what happens if something outside of the directive changes the real value? A chain of events is kicked off which synchronises everything:
On changing the select
  1. The real model is changed outside of NGModelController
  2. Angular says "hey NGModelController! The model has updated!"
  3. NGModelController updates $modelValue
  4. The $formatters chain is be triggered, and converts the $modelValue to the$viewValue
  5. The $viewValue has been updated by $formatters
  6. Because the $viewValue has been updated, the $render function gets kicked off
  7. The $render function updates the scope values
  8. The watch function picks up that something has changed on the scope value
  9. Watch calls $setViewValue, which sets the $viewValue
  10. Change to $viewValue sets kicks off the parser chain $parsers
  11. Parser chain updates the underlying $modelValue
  12. Some kind of Angular magic happens!
  13. The real model is updated. Everything in synchronised!
You can observe this by adding <input ng-model="background”> and changing the value in there and you can see that formatters is kicked off.

More on the topic

There is more to NGModelController. In the next article in this series, we look at validation!

Monday, December 14, 2015

mouse positioning in browser: difference between pageX, clientX, offsetX,screenX

Ref: http://www.jacklmoore.com/notes/mouse-position/


Cross-browser mouse positioning

Understanding and normalizing differences between the mouse position event properties between browsers.

November 27th, 2012

Mouse Event Properties

clientX, clientY

Standard: W3C Recommendation
Mouse position relative to the browser's visible viewport.

screenX, screenY

Standard: W3C Recommendation
Mouse position relative to the user's physical screen.

offsetX, offsetY

Standard: W3C Working Draft
Mouse position relative to the target element. This is implemented very inconsistently between browsers.

pageX, pageY

Standard: W3C Working Draft
Mouse position relative to the html document (ie. layout viewport).

x, y

Standard: W3C Working Draft
Equivalent to clientX, clientY, but is unsupported by some browsers. Use clientX, clientY instead.

layerX, layerY

No Standard
Mouse position relative to the closest positioned ancestor element. If none of the ancestor elements have positioning, the mouse position is relative to the document (like pageX, pageY). LayerX, layerY have an uncertain future.
QuirksMode has a great compatibility table that details inconsistencies in the non-standard properties. Know that only clientX, clientY, screenX, and screenY are part of the W3C Spec.

Normalization

Calculating pageX, pageY

The only major browser that does not support these properties is IE8. If you are doing event handling with jQuery, it will automatically normalize pageX and pageY for you. If you are not using jQuery's normalized events but still have access to the jQuery, you can use jQuery.event.fix to normalize the event object. Example:
document.body.onclick = function(e) {
    e = e || window.event;
    e = jQuery.event.fix(e);
    console.log([e.pageX, e.pageY]);
};
Without jQuery, the clientX and clientY properties can be added to the viewports scrollLeft and scrollTop to calculate the pageX and pageY values.
document.body.onclick = function(e) {
    e = e || window.event;

    var pageX = e.pageX;
    var pageY = e.pageY;
    if (pageX === undefined) {
        pageX = e.clientX + document.body.scrollLeft + document.documentElement.scrollLeft;
        pageY = e.clientY + document.body.scrollTop + document.documentElement.scrollTop;
    }

    console.log([pageX, pageY]);
};

Calculating offsetX, offsetY

According to the W3C Working Draft, offsetX and offsetY should be relative to the padding edge of the target element. The only browser using this convention is IE. Webkit uses the border edge, Opera uses the content edge, and FireFox does not support the properties.
Normalizing to the border edge is easiest to do, thanks to the nifty element.getBoundingClientRect:
document.body.onclick = function(e) {
    e = e || window.event;

    var target = e.target || e.srcElement,
        rect = target.getBoundingClientRect(),
        offsetX = e.clientX - rect.left,
        offsetY = e.clientY - rect.top;

    console.log([offsetX, offsetY]);
};
If you wanted to normalize to the W3C draft spec, then the border width needs to be subtracted from the previously calculated offsetX and offsetY:
document.body.onclick = function(e) {
    e = e || window.event;

    var target = e.target || e.srcElement,
        style = target.currentStyle || window.getComputedStyle(target, null),
        borderLeftWidth = parseInt(style['borderLeftWidth'], 10),
        borderTopWidth = parseInt(style['borderTopWidth'], 10),
        rect = target.getBoundingClientRect(),
        offsetX = e.clientX - borderLeftWidth - rect.left,
        offsetY = e.clientY - borderTopWidth - rect.top;

    console.log([offsetX, offsetY]);
};

Tuesday, December 8, 2015

Angular(1.3.19) expressions and mouse events

Ref: https://code.angularjs.org/1.3.19/docs/guide/expression#-event-

Angular Expressions

Angular expressions are JavaScript-like code snippets that are usually placed in bindings such as {{ expression }}.
For example, these are valid expressions in Angular:
  • 1+2
  • a+b
  • user.name
  • items[index]

Angular Expressions vs. JavaScript Expressions

Angular expressions are like JavaScript expressions with the following differences:
  • Context: JavaScript expressions are evaluated against the global window. In Angular, expressions are evaluated against a scopeobject.
  • Forgiving: In JavaScript, trying to evaluate undefined properties generates ReferenceError or TypeError. In Angular, expression evaluation is forgiving to undefined and null.
  • No Control Flow Statements: You cannot use the following in an Angular expression: conditionals, loops, or exceptions.
  • No Function Declarations: You cannot declare functions in an Angular expression, even inside ng-init directive.
  • No RegExp Creation With Literal Notation: You cannot create regular expressions in an Angular expression.
  • No Comma And Void Operators: You cannot use , or void in an Angular expression.
  • Filters: You can use filters within expressions to format data before displaying it.
If you want to run more complex JavaScript code, you should make it a controller method and call the method from your view. If you want toeval() an Angular expression yourself, use the $eval() method.

Example

  Edit in Plunker
<span>
  1+2={{1+2}}
</span>
You can try evaluating different expressions here:
  Edit in Plunker
<div ng-controller="ExampleController" class="expressions">
  Expression:
  <input type='text' ng-model="expr" size="80"/>
  <button ng-click="addExp(expr)">Evaluate</button>
  <ul>
   <li ng-repeat="expr in exprs track by $index">
     [ <a href="" ng-click="removeExp($index)">X</a> ]
     <code>{{expr}}</code> => <span ng-bind="$parent.$eval(expr)"></span>
    </li>
  </ul>
</div>

Context

Angular does not use JavaScript's eval() to evaluate expressions. Instead Angular's $parse service processes these expressions.
Angular expressions do not have access to global variables like windowdocument or location. This restriction is intentional. It prevents accidental access to the global state – a common source of subtle bugs.
Instead use services like $window and $location in functions called from expressions. Such services provide mockable access to globals.
  Edit in Plunker
<div class="example2" ng-controller="ExampleController">
  Name: <input ng-model="name" type="text"/>
  <button ng-click="greet()">Greet</button>
  <button ng-click="window.alert('Should not see me')">Won't greet</button>
</div>

Forgiving

Expression evaluation is forgiving to undefined and null. In JavaScript, evaluating a.b.c throws an exception if a is not an object. While this makes sense for a general purpose language, the expression evaluations are primarily used for data binding, which often look like this:
{{a.b.c}}
It makes more sense to show nothing than to throw an exception if a is undefined (perhaps we are waiting for the server response, and it will become defined soon). If expression evaluation wasn't forgiving we'd have to write bindings that clutter the code, for example:{{((a||{}).b||{}).c}}
Similarly, invoking a function a.b.c() on undefined or null simply returns undefined.

No Control Flow Statements

Apart from the ternary operator (? b : c), you cannot write a control flow statement in an expression. The reason behind this is core to the Angular philosophy that application logic should be in controllers, not the views. If you need a real conditional, loop, or to throw from a view expression, delegate to a JavaScript method instead.

No function declarations or RegExp creation with literal notation

You can't declare functions or create regular expressions from within AngularJS expressions. This is to avoid complex model transformation logic inside templates. Such logic is better placed in a controller or in a dedicated filter where it can be tested properly.

$event

Directives like ngClick and ngFocus expose a $event object within the scope of that expression. The object is an instance of a jQuery Event Object when jQuery is present or a similar jqLite object.
  Edit in Plunker
<div ng-controller="EventController">
  <button ng-click="clickMe($event)">Event</button>
  <p><code>$event</code>: <pre> {{$event | json}}</pre></p>
  <p><code>clickEvent</code>: <pre>{{clickEvent | json}}</pre></p>
</div>
Note in the example above how we can pass in $event to clickMe, but how it does not show up in {{$event}}. This is because$event is outside the scope of that binding.

One-time binding

An expression that starts with :: is considered a one-time expression. One-time expressions will stop recalculating once they are stable, which happens after the first digest if the expression result is a non-undefined value (see value stabilization algorithm below).
  Edit in Plunker
angular.module('oneTimeBidingExampleApp', []).
controller('EventController', ['$scope', function($scope) {
  var counter = 0;
  var names = ['Igor', 'Misko', 'Chirayu', 'Lucas'];
  /*
   * expose the event object to the scope
   */
  $scope.clickMe = function(clickEvent) {
    $scope.name = names[counter % names.length];
    counter++;
  };
}]);

Why this feature

The main purpose of one-time binding expression is to provide a way to create a binding that gets deregistered and frees up resources once the binding is stabilized. Reducing the number of expressions being watched makes the digest loop faster and allows more information to be displayed at the same time.

Value stabilization algorithm

One-time binding expressions will retain the value of the expression at the end of the digest cycle as long as that value is not undefined. If the value of the expression is set within the digest loop and later, within the same digest loop, it is set to undefined, then the expression is not fulfilled and will remain watched.
  1. Given an expression that starts with ::, when a digest loop is entered and expression is dirty-checked, store the value as V
  2. If V is not undefined, mark the result of the expression as stable and schedule a task to deregister the watch for this expression when we exit the digest loop
  3. Process the digest loop as normal
  4. When digest loop is done and all the values have settled process the queue of watch deregistration tasks. For each watch to be deregistered check if it still evaluates to value that is not undefined. If that's the case, deregister the watch. Otherwise keep dirty-checking the watch in the future digest loops by following the same algorithm starting from step 1

Special case for object literals

Unlike simple values, object-literals are watched until every key is defined. See http://www.bennadel.com/blog/2760-one-time-data-bindings-for-object-literal-expressions-in-angularjs-1-3.htm

How to benefit from one-time binding

If the expression will not change once set, it is a candidate for one-time binding. Here are three example cases.
When interpolating text or attributes:
<div name="attr: {{::color}}">text: {{::name}}</div>
When using a directive with bidirectional binding and the parameters will not change:
someModule.directive('someDirective', function() {
  return {
    scope: {
      name: '=',
      color: '@'
    },
    template: '{{name}}: {{color}}'
  };
});
<div some-directive name="::myName" color="My color is {{::myColor}}"></div>
When using a directive that takes an expression:
<ul>
  <li ng-repeat="item in ::items">{{item.name}};</li>
</ul>